Configure Virtual Directories in Exchange 2013

Login to the Exchange Admin Center.

- Step 1 -> Click on Servers.
- Step 2 -> Click on Virtual Directories
- Step 3 -> Click the drop down menu and select your first server, leave the select type as “All”
In the next section we are going to setup/configure the following:
- Autodiscover
- ECP
- EWS
- ActiveSync
- OAB
- OWA
- PowerShell
Autodiscover
Double Click Autodiscover (Default Web Site) or click on the name and then click the Pencil.

- Click on the Authentication Tab.
- Select your Authentication Type.
- Click Save.
ECP
Double Click ECP (Default Web Site) or click on the name and then click the Pencil.

- On the General tab configure you Internal and External URL (this is the name you specified on your certificate)
- Click on the Authentication Tab and set your preferred method.
- Click Save.
EWS
Double Click EWS (Default Web Site) or click on the name and then click the Pencil.

- On the General tab configure you Internal and External URL (this is the name you specified on your certificate)
- Click on the Authentication Tab and set your preferred method.
- Click Save.
Microsoft-Server-ActiveSync
Double Click Microsoft-Server-ActiveSync (Default Web Site) or click on the name and then click the Pencil.

- On the General tab configure you Internal and External URL.
- Click on the Authentication Tab and set your preferred method.
- Click Save.
OAB
Double Click OAB (Default Web Site) or click on the name and then click the Pencil. 
- Configure you Internal and External URL.
- Click Save.
OWA
Double Click OWA (Default Web Site) or click on the name and then click the Pencil.

- On the General tab configure your Internal and External URL.

- On the Authentication Tab select your method.
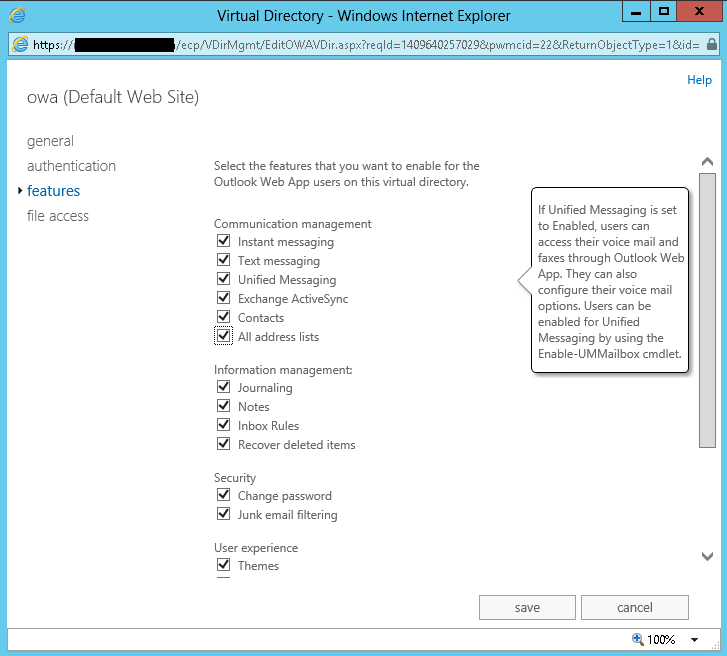
- On the features tab, enable the features you want users to have access to/see.

- On the file access tab make your selections.
- Click Save.
PowerShell
Double Click Powershell (Default Web Site) or click on the name and then click the Pencil.

- On the General tab configure you Internal and External URL.
- Click on the Authentication Tab and set your preferred method.
- Click Save
Setup Exchange Virtual Directories using PowerShell
Setup Exchange Virtual Directories using PowerShell
OWA
Set-OwaVirtualDirectory

Set-OWAVirtualDirectory –Identity "OWA (default web site)" -ExternalURL "https://mail.myousufali.com/OWA"

Set-OWAVirtualDirectory –Identity "OWA (default web site)" -InternalURL "https://mail.myousufali.com/OWA"
OAB
Set-OABVirtualDirectory

Set-OABVirtualDirectory –Identity "OAB (default web site)" -ExternalURL "https://mail.myousufali.com/OAB"

Set-OABVirtualDirectory –Identity "OAB (default web site)" -InternalURL "https://mail.myousufali.com/OAB"
ECP
Set-ECPVirtualDirectory

Set-ECPVirtualDirectory –Identity "ECP (default web site)" -ExternalURL "https://mail.myousufali.com/ECP"

Set-ECPVirtualDirectory –Identity "ECP (default web site)" -InternalURL "https://mail.myousufali.com/ECP"
EWS
Set-WebServicesVirtualDirectory

Set-WebServicesVirtualDirectory –Identity "EWS (default web site)" -ExternalUrl "https://mail.myousufali.com/ews/exchange.asmx"

Set-WebServicesVirtualDirectory –Identity "EWS (default web site)" -InternalUrl "https://mail.myousufali.com/ews/exchange.asmx"
ActiveSync
Set-ActiveSyncVirtualDirectory

Set-ActiveSyncVirtualDirectory –Identity "Microsoft-Server-ActiveSync (default web site)" -ExternalURL "https://mail.myousufali.com/Microsoft-Server-ActiveSync"

Set-ActiveSyncVirtualDirectory –Identity "Microsoft-Server-ActiveSync (default web site)" -InternalURL https://mail.myousufali.com/Microsoft-Server-ActiveSync
Autodiscover
Set-AutodiscoverVirtualDirectory

Not enabled as default. Please note that autodiscover must be set as an A-record in your DNS. Also note that you do not provide an url for this.

Set-ClientAccessServer -Identity ex2013 -AutoDiscoverServiceInternalURI https://mail.myousufali.com/Autodiscover/Autodiscover.xml

Set-AutodiscoverVirtualDirectory -Identity 'Autodiscover (Default Web Site)' -WindowsAuthentication $false -BasicAuthentication $false -DigestAuthentication $true
MAPI/HTTP
MAPI over HTTP
Not enabled as default. Requires Exchange 2013 SP1. Clients must be Outlook 2013 or newer. Fallback is OutlookAnywhere for older clients.
Set-MapiVirtualDirectory -Identity "mapi (Default Web Site)" -InternalUrl "https://mail.myousufali.com/mapi" -IISAuthenticationMethods NTLM,Negotiate
After setting up the Virtual Directory you need to enable it:
Set-OrganizationConfig -MapiHttpEnabled $true
Exchange 2013 : Default virtual directories settings
On Exchange server, configuring virtual directory might be pain sometime. A simple misconfiguration of Virtual directory might be the worst nightmare and create login loop, because I had this few days back. While configuring additional CAS server after few changes done on the Virtual directory, my OWA/ECP page start to go on loop whenever I tried to get login. I was on dark what mistake I had made. So, I tried to list down what might the issue that is causing on looping of my OWA/ECP page. While listing down, I have found two things.
- SSL Certificate.
- Issue with configuration of Virtual Directory.
SSL Certificate can also be the reason behind this kind of issue. So, you need to make sure you do have correct SSL assigned with IMAP, POP, IIS and SMTP. Also 2nd thing is that SSL certificate is across all of your Exchange server. If the issue is with SSL Certificate, you are lucky and can be resolve easily. But with virtual directory it is not so.
Above you can find how to configure Virtual Directory. But as going on, I came for the conclusion with that might not be enough if OWA/ECP login loop issue arises. Hence, here I have made an Table with the specific configuration required while configuring the OWA/ECP Virtual Directory.
On the IIS Manager expand to the default web site and check if the configuration you have made are as of the below Table are not.
Table: Chart of Virtual Directory configuration.

Similarly, only configuration of Default website is not going to solve this issue. Hence you need more Knowledge on configuration of Exchange Back End site too, else you will keep on going loop. Below is the detail configuration you can have on Exchange Back End.
Table: Exchange Back End Virtual Directory Configuration.
|
Virtual directory
|
IIS Default Authentication methods
|
IIS SSL settings
|
HTTP Redirect
|
|
Exchange Back End
|
|
• Not Required
|
Yes
|
|
Autodiscover
|
• Anonymous authentication
• Windows authentication
|
• SSL required
• Ignore client certificates
|
No
|
|
ecp
|
• Anonymous authentication
• Windows authentication
|
• SSL required
• Ignore client certificates
|
No
|
|
EWS
|
• Anonymous authentication
• Windows authentication
|
• SSL required
• Ignore client certificates
|
No
|
|
Exchange*
|
|
• SSL required
• Ignore client certificates
|
No
|
|
Exchweb*
|
|
• SSL required
• Ignore client certificates
|
No
|
|
mapi*
|
• Anonymous authentication
|
• SSL required
• Ignore client certificates
|
No
|
|
Microsoft-Server-ActiveSync
|
• Basic authentication
|
• SSL required
• Ignore client certificates
|
No
|
|
OAB
|
• Windows authentication
|
• SSL required
• Ignore client certificates
|
No
|
|
owa
|
• Anonymous authentication
• Windows authentication
|
• SSL required
• Ignore client certificates
|
No
|
|
owa\Calender
|
• Anonymous authentication
|
• Ignore client certificates
|
No
|
|
PowerShell
|
• Windows authentication
|
• SSL required
• Accept client certificates
|
No
|
|
Public*
|
|
• SSL required
• Ignore client certificates
|
No
|
|
PushNotifications
|
• Anonymous authentication
• Windows authentication
|
• SSL required
• Ignore client certificates
|
No
|
|
Rpc
|
• Windows authentication
|
• Ignore client certificates
|
No
|
|
RpcWithCert
|
• Windows authentication
|
• Ignore client certificates
|
No
|
I hope this will help you solving the Exchange OWA/ECP login loop issue.